
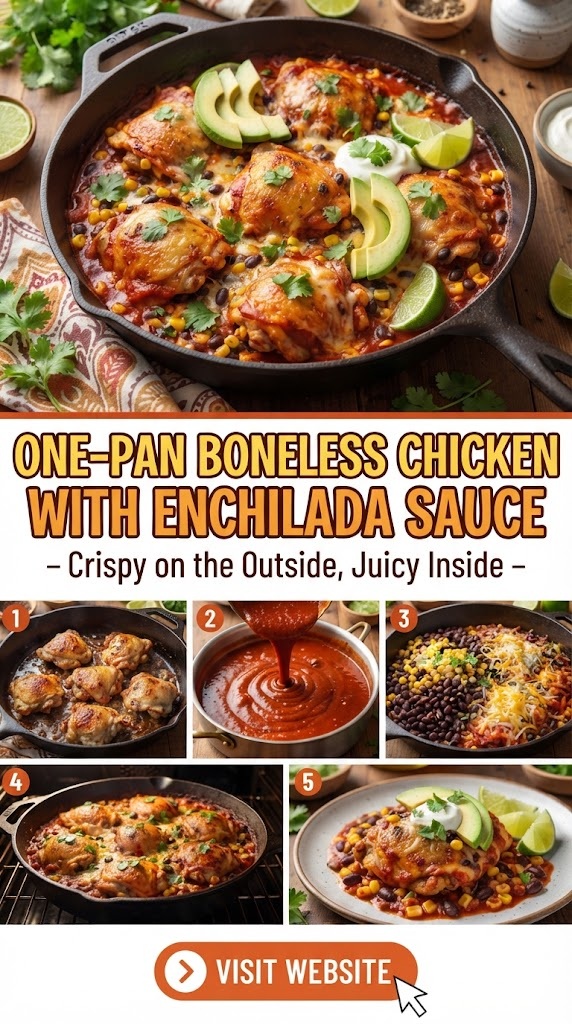
In the world of weeknight cooking, there is a holy grail that every home chef seeks: a meal that requires only one pan, takes less than thirty minutes, and tastes like it came from a high-end Mexican cantina. Enter the One-Pan Boneless Chicken with Enchilada Sauce. This isn’t just another chicken recipe; it is a masterclass in texture and flavor. We are talking about chicken that achieves a golden, shatteringly crisp exterior while remaining incredibly tender and dripping with juice on the inside, all bathed in a rich, smoky, and slightly spicy enchilada sauce.
Whether you are a busy parent trying to get a nutritious meal on the table or a culinary enthusiast looking to perfect your searing technique, this guide will take you through every nuance of this dish. From the science of the Maillard reaction to the history of chili-based sauces, this is the comprehensive deep dive into the best chicken dinner you’ll ever make.
Why This Dish is a Game-Changer
Most chicken breast or thigh recipes fall into one of two traps: either the chicken is flavorful but soggy because it was simmered in liquid, or it is crispy but dry because it was overcooked in an attempt to get that crust. This recipe solves that dilemma by utilizing a specific two-stage cooking process.
- The High-Heat Sear: We create a crust first. By using a light dredge and high-heat fat, we lock in the juices.
- The Sauce Reduction: Instead of drowning the chicken, we simmer the sauce around it, allowing the bottom of the chicken to absorb the spice while the top remains beautifully crisp.
The result is a multidimensional eating experience. You get the crunch, the succulent meat, and the velvet-smooth sauce in every single forkful.
The Secret to Crispy on the Outside, Juicy Inside
To achieve professional-level results at home, we need to understand the physics of the pan. Here is how we ensure that “crispy-juicy” dichotomy.
1. Moisture is the Enemy of Crispiness
Before the chicken ever touches the pan, it must be bone-dry. If there is water on the surface of the meat, the heat of the pan will turn that water into steam. Steam cooks meat, but it does not brown it. Always pat your boneless chicken thighs or breasts with paper towels until they are tacky to the touch.
2. The Power of the Dredge
While you can sear naked chicken, a very light coating of flour (or cornstarch for a gluten-free option) acts as a sacrificial layer. It absorbs any remaining surface moisture and creates a micro-thin “shell” that browns deeply and holds onto the enchilada sauce later.
3. The Fat Choice
To get a crispy exterior, you need a fat with a high smoke point. Avocado oil, grapeseed oil, or clarified butter (ghee) are excellent choices. Avoid extra virgin olive oil for the initial sear, as it can burn and turn bitter at the temperatures required for a perfect crust.
4. Don’t Crowd the Pan
If you put too many pieces of chicken in the pan at once, the temperature of the metal will drop significantly. Furthermore, the moisture escaping from the chicken will have nowhere to go, creating a steam chamber. Work in batches if necessary to ensure every piece has its own space to breathe and brown.
The Anatomy of a Perfect Enchilada Sauce
While store-bought sauce works in a pinch, a homemade enchilada sauce elevates this dish from “good” to “extraordinary.” Traditional enchilada sauce is not a tomato sauce; it is a chili sauce.
The Flavor Profile
A great red enchilada sauce should hit several notes:
- Smokiness: Usually from cumin and smoked paprika or chipotle powder.
- Earthiness: From dried oregano (preferably Mexican oregano) and chili powder.
- Tang: A hint of apple cider vinegar or lime juice to cut through the richness of the chicken fat.
- Body: A light roux (flour and fat) gives the sauce a silky texture that coats the back of a spoon.
Red vs. Green
For this specific “crispy-juicy” recipe, Red Enchilada Sauce is generally preferred. The sugars in the red chilies and tomato paste caramelize beautifully against the seared chicken. However, a Green Enchilada Sauce (made with tomatillos and green chilies) offers a brighter, more acidic profile that works wonders if you are using boneless chicken breasts, which benefit from the extra zing.
Ingredients You Will Need
To create this masterpiece, you’ll need a mix of fresh proteins and pantry staples.
For the Chicken:
- 1.5 lbs Boneless, Skinless Chicken Thighs: Thighs are more forgiving and stay juicier than breasts.
- Salt and Freshly Cracked Black Pepper: Essential for building the base flavor.
- All-Purpose Flour (or Cornstarch): Just enough to dust the surface.
- Garlic Powder and Onion Powder: To season the dredge.
- 2 Tablespoons High-Heat Oil: Avocado or Grapeseed.
For the Homemade Enchilada Sauce:
- 2 Tablespoons Oil or Butter: To start the roux.
- 2 Tablespoons Flour: To thicken the sauce.
- 2-3 Tablespoons Chili Powder: This provides the color and the base heat.
- 1 Teaspoon Cumin: For that classic Mexican aroma.
- 1/2 Teaspoon Garlic Powder: For depth.
- 1/4 Teaspoon Dried Oregano: Preferably Mexican.
- 2 Cups Chicken Broth: Low sodium is best so you can control the salt.
- 1 Tablespoon Tomato Paste: For richness and color.
- 1 Teaspoon Apple Cider Vinegar: To brighten the flavors.
For Finishing and Toppings:
- 1 Cup Shredded Cheese: Monterey Jack, Sharp Cheddar, or a Mexican Blend.
- Fresh Cilantro: Chopped for a burst of freshness.
- Red Onion: Finely diced or pickled.
- Sliced Jalapeños: For an extra kick.
- Sour Cream or Greek Yogurt: To cool things down.
- Avocado: Sliced or mashed.
Step-by-Step Instructions: The Master Method
Step 1: Prep the Chicken
Start by trimming any excess fat from the chicken thighs. Pat them completely dry with paper towels. In a shallow bowl, mix your flour, garlic powder, onion powder, salt, and pepper. Lightly dredge each piece of chicken, shaking off any excess. You want a translucent coating, not a heavy batter.
Step 2: The Perfect Sear
Heat a large cast-iron skillet or heavy-bottomed stainless steel pan over medium-high heat. Add the oil. Once the oil is shimmering (but not smoking), carefully lay the chicken into the pan, smooth side down.
Pro Tip: Press down lightly with a spatula to ensure maximum contact with the pan. Cook for 5–6 minutes without moving the chicken. You are looking for a deep, golden-brown crust. Flip and cook for another 3–4 minutes. Remove the chicken from the pan and set it aside on a plate. It won’t be fully cooked through yet—that’s okay!
Step 3: Build the Sauce
In the same pan (don’t wash it! Those brown bits—the fond—are pure flavor), lower the heat to medium. Add a little more oil or butter if the pan is dry. Whisk in the flour and chili powder. Cook for 1 minute, whisking constantly, to toast the spices and cook out the raw flour taste.
Slowly pour in the chicken broth while whisking vigorously to prevent lumps. Add the tomato paste, cumin, oregano, and vinegar. Let the sauce simmer for 3–5 minutes until it thickens slightly. Taste and adjust salt as needed.
Step 4: The Fusion
Nestle the seared chicken back into the pan, placing it directly into the bubbling sauce. Important: Try to keep the top “crispy” side of the chicken above the sauce line. This allows the bottom to soak up the flavor while the top retains its texture.
Step 5: The Melt
Sprinkle the shredded cheese over the chicken. If your pan is oven-safe, you can pop it under the broiler for 1–2 minutes to get the cheese bubbly and slightly browned. Otherwise, simply cover the pan with a lid for 60 seconds until the cheese melts.
Step 6: Garnish and Serve
Remove from heat. Top with fresh cilantro, onions, and jalapeños. Serve immediately while the contrast between the crispy chicken and the velvety sauce is at its peak.
Troubleshooting Common Issues
My Chicken isn’t Crispy
This usually happens for three reasons:
- The pan wasn’t hot enough: If the chicken doesn’t sizzle loudly when it hits the oil, the pan is too cold.
- Too much oil: You want to sear, not deep-fry.
- Steam: If you cover the pan during the initial searing phase, the moisture will soften the crust. Never cover the pan until the very end when melting the cheese.
The Sauce is Too Thick
Enchilada sauce thickens as it sits. If it becomes a paste, simply whisk in a tablespoon or two of water or chicken broth to loosen it back up to a pourable consistency.
The Chicken is Dry
If you are using chicken breasts, they can go from juicy to dry in a matter of seconds. Use a meat thermometer and pull the chicken when it hits an internal temperature of 160°F (71°C). The “carry-over” heat will bring it to the safe 165°F (74°C) mark while it rests in the sauce.
Dietary Variations and Substitutions
Keto and Low-Carb
To make this Keto-friendly, replace the flour in the dredge with almond flour or crushed pork rinds. For the sauce, skip the flour roux and instead thicken the sauce by simmering it longer or adding a touch of heavy cream at the end. Serve over cauliflower rice or sautéed zucchini.
Dairy-Free
Skip the cheese or use a high-quality vegan shred. To add creaminess without dairy, dollop some cashew cream or extra avocado on top before serving.
Extra Spicy
The heat in enchilada sauce comes from the chili powder. For a real kick, add a teaspoon of cayenne pepper or a chopped chipotle pepper in adobo sauce to the broth while simmering.
Using Leftover Rotisserie Chicken
If you are in a massive rush, you can use shredded rotisserie chicken. You won’t get the “crispy outside” effect, but you can still follow the sauce-making steps and toss the chicken in at the end for a 10-minute meal.
The Best Side Dishes for One-Pan Enchilada Chicken
While this dish is a star on its own, the right sides turn it into a feast.
1. Cilantro Lime Rice
The acidity of the lime and the freshness of the cilantro cut through the smoky richness of the enchilada sauce. For a healthier twist, use quinoa or brown rice.
2. Refried Black Beans
Creamy black beans provide a textural contrast to the crispy chicken. Top them with a little crumbled cotija cheese for an authentic touch.
3. Mexican Street Corn (Elote)
If you want to go all out, serve this chicken alongside grilled corn slathered in mayo, lime, and chili powder. The sweetness of the corn balances the savory sauce beautifully.
4. Simple Cabbage Slaw
A crunchy slaw made with shredded cabbage, lime juice, and a touch of honey acts as a palate cleanser between bites of the rich chicken.
Meal Prep and Storage Tips
This recipe is a meal-prepper’s dream, though you will lose some of that initial “shatter-crisp” texture upon reheating.
- Storage: Store leftovers in an airtight container in the refrigerator for up to 4 days.
- Reheating: For best results, reheat in a skillet over medium heat. This helps the chicken “re-fry” slightly in its own juices. If using a microwave, heat at 70% power to prevent the chicken from becoming rubbery.
- Freezing: You can freeze the cooked chicken in the sauce for up to 3 months. Thaw overnight in the fridge before reheating.
The Science of Flavor: Why Enchilada Sauce and Chicken Work
Culinary science tells us that the most satisfying dishes balance the five basic tastes: sweet, sour, salty, bitter, and umami.
- Umami: Comes from the chicken and the concentrated tomato paste.
- Salty: From the chicken broth and the cheese.
- Sour: From the apple cider vinegar and lime juice garnish.
- Bitter/Earthy: From the toasted chili powder and cumin.
- Sweet: A subtle sweetness comes from the caramelized onions and the natural sugars in the dried chilies.
When you sear the chicken, you are initiating the Maillard Reaction. This is a chemical reaction between amino acids and reducing sugars that gives browned food its distinctive flavor. By combining the complex flavors of the Maillard reaction with the multi-tonal notes of the enchilada sauce, you create a dish that satisfies every part of the human palate.
Frequently Asked Questions
Can I use chicken breasts instead of thighs?
Yes, but be careful. Breasts have much less fat and can dry out quickly. If using breasts, consider pounding them to an even thickness before dredging to ensure they cook quickly and evenly.
Is enchilada sauce the same as taco sauce?
No. Taco sauce is usually tomato-based and thinner, often used as a cold topping. Enchilada sauce is a cooked sauce based on a roux and chili powders, designed to be baked or simmered.
What kind of pan is best?
A cast-iron skillet is the gold standard for this recipe because it retains heat exceptionally well, leading to a superior crust. However, a heavy stainless steel pan or a high-quality non-stick pan will also work.
Can I make the sauce ahead of time?
Absolutely. Enchilada sauce actually tastes better the next day as the spices have more time to bloom. You can make a big batch and keep it in the fridge for up to a week.
The Art of Presentation
We eat with our eyes first. To make this one-pan meal look like a restaurant-quality dish, follow these plating tips:
- Color Contrast: The sauce is dark red/brown. Use bright green cilantro and stark white sour cream to make the colors pop.
- Height: Instead of laying the chicken flat, slightly overlap the pieces in the pan.
- The “Swoosh”: If serving on a plate, put a spoonful of sauce down first, “swoosh” it with the back of a spoon, and set the chicken on top to keep the crust dry until the moment it’s eaten.
Health Benefits of This Recipe
While it feels like a “comfort food” indulgence, this dish is surprisingly packed with nutrition.
- High Protein: Chicken thighs are an excellent source of lean protein, essential for muscle repair and satiety.
- Capsaicin: Found in chili powder, capsaicin is known to boost metabolism and has anti-inflammatory properties.
- Cumin: This spice is a powerhouse for digestion and is rich in iron.
- Lycopene: The tomato paste provides a concentrated dose of lycopene, a powerful antioxidant that supports heart health.
By controlling the ingredients—using low-sodium broth and heart-healthy oils—you can make this a staple of a balanced diet.
Conclusion: A New Weeknight Classic
The One-Pan Boneless Chicken with Enchilada Sauce is more than just a recipe; it’s a technique that will change the way you look at stovetop chicken. By focusing on the drying and searing process, you unlock a level of texture that is often missing from home-cooked meals. When that crispy chicken meets the deep, smoky soul of a well-made enchilada sauce, magic happens.
It’s efficient, it’s affordable, and most importantly, it’s delicious. No more dry chicken, no more boring dinners, and no more sink full of dishes. Just one pan, a few simple ingredients, and a meal that will have everyone at the table asking for seconds.
Give this method a try tonight. Whether you follow the recipe to the letter or add your own creative twist with extra spice or different cheeses, you are now equipped with the knowledge to create the ultimate crispy-outside, juicy-inside chicken masterpiece. Enjoy the process, and even more so, enjoy the flavor.