
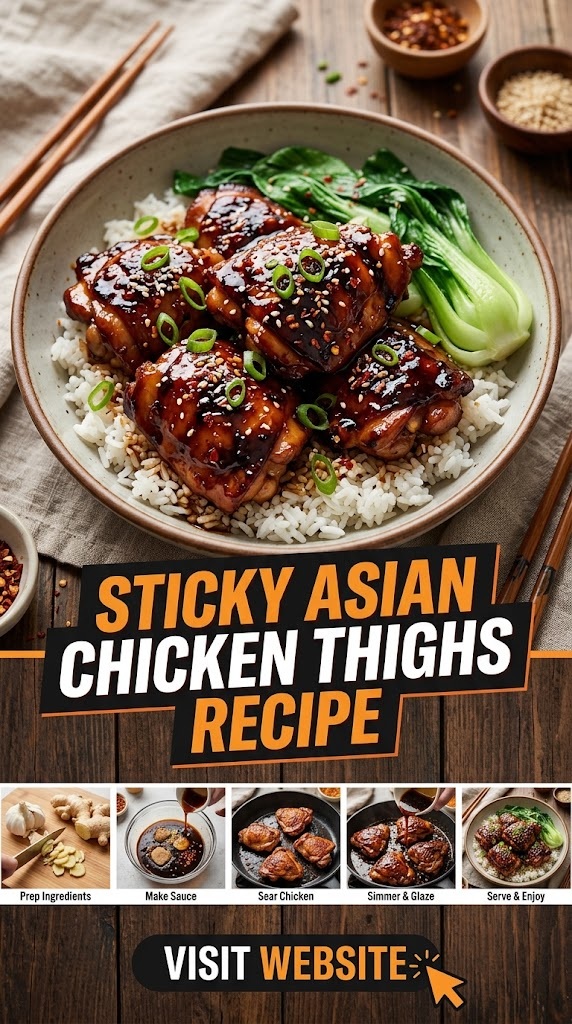
There is a specific kind of culinary magic that happens when high heat meets the perfect balance of sugar, salt, and umami. It’s that moment when a thin, watery marinade transforms into a thick, lacquered glaze that clings to every crevice of a piece of poultry. Sticky Asian Chicken Thighs are the quintessential example of this transformation. This dish isn’t just a meal; it’s an experience—a symphony of textures ranging from the crispy, rendered skin of the chicken to the gooey, sweet-and-savory coating that demands to be licked off your fingers.
In this comprehensive guide, we are going to dive deep into the world of Asian-inspired glazes. We will explore the science of the chicken thigh, the chemistry of the perfect sauce, and the techniques used by professional chefs to achieve that restaurant-quality “sticky” factor at home. Whether you are a weeknight warrior looking for a 30-minute win or a weekend gourmet seeking to perfect your pan-searing technique, this article is your definitive resource.
Why Chicken Thighs are the Superior Choice
When it comes to “sticky” recipes, the cut of meat matters immensely. While chicken breasts are often touted for their lean protein content, they are notoriously difficult to keep moist under the high temperatures required to caramelize a sugar-based sauce.
The Fat Factor
Chicken thighs contain a higher percentage of intramuscular fat and connective tissue (collagen) than breasts. As the chicken cooks, this fat renders out, basting the meat from the inside out. This makes thighs incredibly forgiving; even if you overcook them by a few minutes, they remain succulent and juicy.
Flavor Absorption
Dark meat has a more robust, “chickeny” flavor that can stand up to the aggressive profiles of soy sauce, ginger, and garlic. A delicate breast meat might be overwhelmed by a heavy glaze, but the thigh complements it perfectly.
Skin-On vs. Skinless
For the ultimate sticky chicken, skin-on, bone-in thighs are the gold standard. The skin provides a layer of fat that protects the meat and offers a crispy texture that contrasts beautifully with the sticky sauce. However, if you are looking for a faster cooking time or a lower-calorie option, boneless, skinless thighs still work wonders because their texture remains superior to breasts.
The Anatomy of the Perfect Sticky Glaze
The “sticky” in Sticky Asian Chicken comes from the caramelization of sugars and the reduction of liquids. To achieve the perfect balance, you need to hit five key flavor profiles: Salty, Sweet, Sour, Spicy, and Umami.
1. The Salty Base: Soy Sauce
Soy sauce is the foundation. It provides salt and a deep, fermented depth.
- Light Soy Sauce: Provides saltiness without darkening the meat too much.
- Dark Soy Sauce: Used sparingly for its intense color and molasses-like thickness.
- Tamari: A great gluten-free alternative that offers a richer, smoother flavor.
2. The Sweet Element: Honey and Sugars
This is what makes the sauce “sticky.” Without sugar, you just have a thin sauce.
- Honey: Adds a floral note and creates a beautiful shine.
- Brown Sugar: Contains molasses, which helps in the caramelization process and adds a warm, earthy sweetness.
- Mirin: A Japanese sweet rice wine that adds a subtle acidity along with its sugar content.
3. The Umami Boosters
Umami is the “savory” fifth taste. It’s what makes you want to keep eating.
- Oyster Sauce: A thick, savory syrup that adds incredible body to the glaze.
- Hoisin Sauce: Often called “Chinese BBQ sauce,” it adds a complex mix of spices, garlic, and fermented soybeans.
- Fish Sauce: Just a teaspoon won’t make the dish taste like fish, but it will skyrocket the savory profile.
4. The Aromatics: Garlic and Ginger
Fresh is non-negotiable here. Powdered versions won’t give you the same aromatic punch.
- Garlic: Finely minced or grated so it melts into the sauce.
- Ginger: Grating the ginger allows the juice to infuse the marinade, providing that signature “zing.”
5. The Acidic Balance
To prevent the sauce from being cloyingly sweet, you need acid.
- Rice Vinegar: Mild and slightly sweet.
- Lime Juice: Adds a bright, citrusy top note that cuts through the fat of the chicken.
Essential Kitchen Gear
Before you start cooking, ensure you have the right tools. The vessel you cook in determines how well the sauce reduces and how crispy the skin gets.
- Cast Iron Skillet: The undisputed king for this recipe. It holds heat exceptionally well, ensuring a consistent sear.
- Stainless Steel Pan: Great for seeing the color of the sauce as it reduces, preventing burning.
- Meat Thermometer: Essential for ensuring the chicken reaches 165°F (74°C) without going over.
- Microplane: The best tool for grating fresh ginger and garlic into a fine paste.
The Master Recipe: Sticky Asian Chicken Thighs
This recipe is designed for 2 lbs of chicken thighs (approximately 4-6 thighs).
Ingredients
For the Chicken:
- 2 lbs Bone-in, skin-on chicken thighs
- 1 tbsp Neutral oil (Grapeseed, Avocado, or Vegetable oil)
- Salt and black pepper to taste
For the Sticky Glaze:
- 1/3 cup Honey (raw or clover)
- 1/4 cup Soy sauce (low sodium is preferred to control salt levels)
- 1 tbsp Oyster sauce
- 1 tbsp Rice vinegar
- 1 tbsp Toasted sesame oil
- 3 cloves Garlic, minced
- 1 tbsp Fresh ginger, grated
- 1 tsp Sriracha or Sambal Oelek (optional, for heat)
- 1 tsp Cornstarch mixed with 1 tbsp water (the “slurry” – optional for extra thickness)
For Garnish:
- Toasted sesame seeds
- Sliced green onions (scallions)
- Fresh cilantro leaves
- Red chili flakes (optional)
Step-by-Step Instructions
Step 1: Prep the Chicken
Pat the chicken thighs bone-dry with paper towels. This is the most important step for crispy skin. Moisture is the enemy of a sear. Season both sides generously with salt and pepper. Note: Go light on the salt, as the soy sauce will add plenty later.
Step 2: The Initial Sear
Place your skillet over medium-high heat and add the oil. Once the oil is shimmering (but not smoking), place the chicken thighs in the pan, skin-side down.
Do not crowd the pan; if necessary, cook in batches. Press down slightly on the thighs to ensure even contact with the metal. Let them sear undisturbed for 6–8 minutes. You are looking for the fat to render and the skin to become golden brown and crispy.
Step 3: Flip and Finish
Flip the chicken thighs over. At this point, the chicken won’t be fully cooked through. If you are using bone-in thighs, they will need more time. Lower the heat to medium and cook for another 5–7 minutes.
Step 4: Make the Glaze
While the chicken is cooking, whisk together the honey, soy sauce, oyster sauce, rice vinegar, sesame oil, garlic, ginger, and chili sauce in a small bowl.
Step 5: The Reduction Phase
Pour the glaze into the skillet with the chicken. The liquid will immediately begin to bubble. Using a spoon, continuously baste the chicken with the sauce.
As the sauce boils, the water content evaporates, leaving behind the sugars and proteins. This is where the “sticky” magic happens. If the sauce seems too thin, add your cornstarch slurry and whisk it into the bubbling liquid. It will thicken into a heavy syrup within 30 seconds.
Step 6: Glaze and Coat
Continue to cook for 3–5 minutes, turning the chicken occasionally to ensure every inch is coated in the darkening glaze. The sauce should be thick enough to coat the back of a spoon. Use a meat thermometer to ensure the internal temperature has reached 165°F.
Step 7: The Garnish
Remove the pan from the heat. The residual heat will continue to thicken the sauce. Sprinkle generously with sesame seeds, green onions, and cilantro.
Pro Techniques for Success
The Secret of “Deglazing”
When you pour the sauce into a hot pan after searing meat, you are deglazing. The liquid lifts the “fond”—those brown, caramelized bits of chicken stuck to the bottom of the pan. This fond is a concentrated flavor bomb that integrates into your sauce, giving it a professional depth of flavor.
Balancing the Sweetness
If you find the sauce too sweet, don’t just add more salt. Add a squeeze of fresh lime juice at the very end. The acid cuts through the sugar and brightens the entire dish.
Avoiding Burnt Garlic
Garlic burns very easily and becomes bitter. By mixing the minced garlic into the liquid glaze before adding it to the pan, you protect the garlic from the direct heat of the skillet, allowing it to soften and release its flavor without charring.
Alternative Cooking Methods
The Air Fryer Method
For a healthier version with even crispier skin:
- Season thighs and air fry at 380°F for 15 minutes.
- While chicken fries, simmer the glaze in a small saucepan on the stove until thickened.
- Toss the cooked chicken in the thickened sauce and air fry for an additional 2–3 minutes at 400°F to “set” the glaze.
The Slow Cooker Method
For “fall-off-the-bone” tenderness:
- Place thighs in the slow cooker.
- Pour the sauce (minus the cornstarch) over them.
- Cook on Low for 6 hours or High for 3 hours.
- Remove the chicken. Pour the liquid into a saucepan, add the cornstarch slurry, and boil until it becomes a thick glaze. Pour back over the chicken before serving.
Flavor Variations to Explore
1. Thai-Inspired Peanut Sticky Chicken
Add 2 tablespoons of creamy peanut butter to the glaze recipe. The fats in the peanut butter create an incredibly rich, satiny texture. Finish with crushed roasted peanuts and extra lime.
2. Korean Gochujang Glaze
Replace the sriracha with 1–2 tablespoons of Gochujang (Korean fermented chili paste). This adds a smoky, earthy heat that is characteristic of Korean BBQ.
3. Orange Ginger Chicken
Add the zest and juice of one large orange to the glaze. The citrus oils in the zest provide a fragrant, floral aroma that pairs perfectly with the ginger.
4. Five-Spice Fusion
Add 1/2 teaspoon of Chinese Five-Spice powder to the marinade. The notes of star anise, cloves, and cinnamon add a sophisticated, traditional Chinese flavor profile.
Best Side Dishes for Sticky Asian Chicken
A dish this flavorful needs sides that can either soak up the extra sauce or provide a refreshing contrast.
1. The Perfect Rice
- Jasmine Rice: Its natural floral aroma complements the Asian flavors perfectly.
- Coconut Rice: Simmer jasmine rice in half water and half coconut milk for a creamy, tropical side.
- Fried Rice: Use day-old rice, some peas, carrots, and an egg to turn this into a full feast.
2. Vegetable Accompaniments
- Garlic Smashed Cucumbers: A cold, vinegary cucumber salad provides the perfect crunchy, cooling contrast to the hot, sticky chicken.
- Charred Broccolini: Toss with sesame oil and salt, then roast or pan-fry until the tips are crispy.
- Bok Choy: Steamed or sautéed with a little ginger and garlic.
3. Low-Carb Options
- Cauliflower Rice: Sauté with a little soy sauce to keep the theme going.
- Zucchini Noodles: Briefly sautéed so they maintain their crunch.
Meal Prep and Storage
Sticky Asian Chicken Thighs are one of the best dishes for meal prep because the sauce helps keep the meat moist during reheating.
- Fridge: Store in an airtight container for up to 4 days.
- Freezer: You can freeze the cooked chicken in its sauce for up to 3 months. Thaw overnight in the fridge before reheating.
- Reheating Tip: To maintain the texture, reheat in a skillet over medium heat with a splash of water to loosen the sauce. Avoid the microwave if possible, as it can make the chicken skin rubbery.
The Science of Searing: Achieving the Maillard Reaction
To understand why this chicken tastes so good, we have to look at the Maillard reaction. This is a chemical reaction between amino acids and reducing sugars that gives browned food its distinctive flavor.
When you sear the chicken thighs skin-side down, you aren’t just cooking them; you are creating hundreds of different flavor compounds. By keeping the skin dry and the pan hot, you maximize this reaction. When the soy-honey glaze hits that seared surface, the sugars in the glaze interact with the proteins in the meat, creating a secondary layer of caramelization. This is why the flavor of “pan-finished” chicken is always superior to “boiled” or “slow-cooked” chicken.
Common Mistakes to Avoid
1. Using Too Much Liquid
If you drown the chicken in a thin marinade and never let it reduce, you won’t get that sticky texture. The “sticky” comes from evaporation. Be patient and let the sauce bubble until the bubbles become large and slow—that’s the sign that the water is gone and only the flavor-packed syrup remains.
2. Moving the Chicken Too Early
When searing the skin, the chicken will naturally “stick” to the pan at first. If you try to flip it too soon, the skin will tear. Wait until the proteins have fully seared; the chicken will “release” itself from the pan when it’s ready to be flipped.
3. Overcrowding the Pan
If you put too many thighs in one skillet, the temperature of the pan will drop. Instead of searing, the chicken will steam in its own juices. This results in grey, rubbery skin. Use two pans or cook in batches if necessary.
Nutrition and Health Considerations
While “sticky” implies sugar, you can make this recipe work for various dietary needs.
- Keto/Low-Carb: Replace the honey and brown sugar with a keto-friendly sweetener like Allulose or Monk Fruit syrup. Allulose is particularly good for this as it caramelizes very similarly to real sugar.
- Gluten-Free: Always use Tamari or Liquid Aminos instead of traditional soy sauce, which contains wheat.
- Lower Sodium: Use “Less Sodium” soy sauce and omit any additional salt during the prep stage.
Chicken thighs are also an excellent source of:
- Selenium: Supports thyroid function and metabolism.
- Vitamin B6: Essential for brain development and function.
- Zinc: Vital for a healthy immune system.
Frequently Asked Questions (FAQs)
Can I use chicken breasts instead?
Yes, but you must be careful not to overcook them. Slice the breasts into bite-sized pieces and stir-fry them quickly. Since breasts lack fat, they won’t have the same depth of flavor as thighs.
My sauce is too salty, how can I fix it?
Add a tablespoon of honey or a splash of rice vinegar. The sweetness and acidity will help balance the sodium. Next time, ensure you are using low-sodium soy sauce.
How do I get that deep red/mahogany color?
The dark color comes from the combination of soy sauce and the caramelization of honey. For an even deeper color, add a teaspoon of Dark Soy Sauce, which is specifically used for coloring in Chinese cuisine.
Can I make the sauce ahead of time?
Absolutely. You can whisk the glaze ingredients together and store them in a jar in the fridge for up to a week. This makes the weeknight cooking process even faster.
Summary: The Secret to Restaurant-Quality Chicken at Home
Mastering Sticky Asian Chicken Thighs is a rite of passage for any home cook. It teaches you the importance of heat management, the balance of flavors, and the patience required for a proper reduction. By choosing high-quality thighs, searing them to perfection, and crafting a glaze that hits every taste bud, you transform humble ingredients into a centerpiece-worthy meal.
The next time you’re tempted to order takeout, remember that with a single skillet and a few pantry staples, you can create something far fresher, healthier, and more satisfying in your own kitchen. Serve it over a bed of steaming jasmine rice, watch the glaze soak into the grains, and enjoy the perfect bite.
Meta Description: Discover the ultimate Sticky Asian Chicken Thighs recipe. Learn the secrets to crispy skin, a perfect honey-soy glaze, and pro techniques for a restaurant-quality meal.
Keywords: Sticky Asian Chicken Thighs, Honey Garlic Chicken, Asian Glazed Chicken, Easy Chicken Thigh Recipes, Best Chicken Glaze, One Pan Asian Chicken, Crispy Chicken Thighs Recipe, Chinese Style Chicken Thighs.